When our Android app company was working on our augmented reality app idea, we wanted to create something useful for a wide audience, learn how to work with the new technology, and ultimately offer something valuable for our clients.
After a short brainstorming session, we came up with an idea of an assistant app for searching marked spots on a map. With it, a user would easily find a parked car, a sunbed they left on a beach or anything else that could've been forgotten earlier on a certain spot.
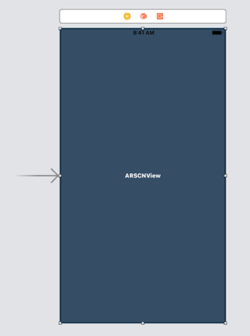
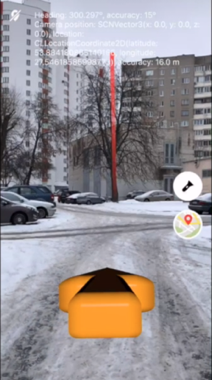
Here’s how it works: the user points their phone’s camera at a spot they want to be marked. It could be any horizontal surface: a spot on the ground, a car, a table, etc. By tapping on their screen the user sets a point (pin) and the app remembers its exact geolocation. Once the user moves to a different location, they can open the app again, and this is where the augmented reality comes into play. On their screen, the user will see an arrow that points to the set pin (the endpoint of the route) and a red ray of light in the spot that was marked earlier.
It should look something like this:

Development tools and terminology
To implement it, the team from our Android & iOS app development company had to choose between two options: native app development using Java and Swift, or Xamarin, a cross-platform technology we are fully comfortable with (see our blog post on comparing Xamarin, React Native, and Flutter).
We decided to go native, and here's why:
- We realized that with Xamarin we wouldn't end up with that much of a cross-platform code since most of our development would require platform-dependent services.
- At the time of developing our app, binding for the ARCore library in Android was not yet updated.
- We didn't have experience working with AR before, so we weren’t sure if the existing Xamarin wrappers would be free of their own specific bugs.
- When it comes to native iOS development there are lots of tutorials available.
Also, the Xamarin tutorial base was significantly smaller, so we would have had to rewrite large amounts of code. And that wouldn't have helped at all in our development speed.
Now, let's talk a little about augmented reality, which is still quite young as the technology itself. In 2016, Apple rolled out its first version of the ARKit framework. This technology uses smartphone sensors, a camera, and a bit of hardcore math to track the phone’s position in space, along with SceneKit - Apple’s graphics engine.
And going forward, when talking about working with ARKit we will mostly be talking about 3D objects and matrices, which means there will be lots of classes and mechanics that come from SceneKit. But first, let's get on the same page with the terminology.
- ARSCNView is a class for displaying an AR scene in the UI of the application. As the name implies, this is the View of the object that contains an AR session and a scene.
- SCNScene is a container (local space) that holds a graph of the SCNNode objects. In fact, this is like a stage in a theater, where all the interaction between the user and augmented reality takes place.
- SCNNode is the core structural element of our virtual scene. Any graphic object on the scene has at least one root node. Nodes can include subnodes, thus forming a graph. The node has its coordinates (x, y, z) in three-dimensional space, and holds information regarding transformation: rotation angles and scaling.
- SCNGeometry is a class that describes a 3D figure on our scene. For example, we would use a SCNSphere class to create a sphere, and SCNPlane – to create a plane. Each geometric object must be assigned to a particular node. Otherwise, it won't appear on the scene.
- ARAnchors are the objects that describe real-world points (for example, a physical point on the ground) with regard to a virtual scene. We will use them mainly for placing 3D objects on a scene that have to be anchored to a real-world surface.
The Store
Check for more


Practice
Now, let's take a look at how to work with these classes. Here, we won't go through the process of creating an AR project, since there are already a ton of the “getting started" tutorials online that can show you that whole process in detail. We will only show how to create models, upload them from a file, and put them on a scene. To work on the project on our storyboard, we must have the ARSCNView class already being established, as well as an outlet created for it.
As mentioned above, ARSCNView contains a scene object and a session object. For the application to run correctly, we have to properly initialize ARSCNView.
The code does not have anything interesting so far. Let's try making a ball and putting it on our virtual scene.
After that we should get something like this:
The ball looks flat since there is no lighting set in place which would add shadow and perspective of a 3D form. Luckily, we can easily add lighting (by default) with the help of:

Now our sphere looks like it has volume. In the default lighting mode, objects on the scene will be lit up from the side where the camera of the phone is pointing.
Most app creators for hire will find it the simplest example of creating and putting an object on an AR scene. Now we will try to use a different approach and load a 3D model right from a scene file. This is a special .scn file that can be opened and edited in Xcode. You can also import files to this extension from popular graphics editors, which gives a developer a ready-to-go 3D model.
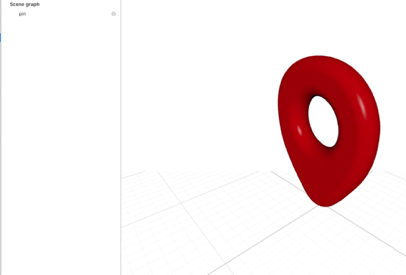
To understand how it works, let’s upload a pin model which we will use to mark a real-world spot on the ground.
Let's assume our scene files are located in the /art.scnassets catalogue. To load the model from the file, we use the following code:
What's happening here:
- We upload the scene with the model.
- We take the root node out from the uploaded scene. For the sake of this example, we used a scene that uses only 1 node (which is the root node).
- We change the starting position from 0 to (0.0, -5) and add the node to the ARSCNView scene.
So this is how the scene with the pin model looks. This scene has its own graph of nodes and a root node with the geometry representing a pin model. This is the root node that we need to upload to the main scene of the application.
We've gone through the basics of AR application development. Now it's time to show you how our iOS development agency used this technology in real-life circumstances.
As we wrote above, our application is able to remember a user's geolocation, and by the means of AR, it shows the direction a user should follow to get to the needed spot.
Thus, the app has to be able to:
- Recognize a horizontal surface,
- Bind a 3D model to this surface,
- Rotate the scene and its objects so that they can relate to the sides of light (corners of the world),
- Transpose geographic coordinates (latitude, longitude) to local coordinates (x, y, z) on the scene.
With the first three, ARKit is able to deal on its own. To enable surface type recognition, we need to alter the object of a configuration.
Now ARKit is able to recognize horizontal surfaces.
To see how this works, we need to slightly tweak the debug options of the view object.
FeaturePoints are special points that ARKit uses when recognizing the real world objects. We can show them on a screen by turning their display mode on to find out whether the application is able to recognize horizontal surfaces.

It looks something like this.
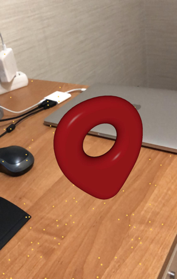
The next step is to teach our app to put objects on the table and bind them to its surface.
Let’s put a pin on a table by tapping on the screen. For this to happen, we need to create a standard event handler for the 'tap' gesture and add it to the view.
Next, we create the selector for processing the event:
Here we are using an interesting function called hitTest, which looks for the real-world objects checking the anchors and relates a 'tapped' point on the screen to the anchor bonded to the surface. After that, we come up with a matrix that describes the position of a point with respect to the real world. That's it - now you have coordinates to which you can associate your pin.
Our app had to be able to compute the vector from the current point to the point where the user put a pin. The task itself would not be that difficult if we were talking about the calculation of a vector with regard to geographical coordinates (longitude, latitude). The main problem is that the geographical north we were guided by was not necessarily meant to correspond to the local north of a scene. Luckily, ARKit is smart enough to be able to rotate a coordinate system to match the true/geodetic north. This could be done through the following configuration:
This option sets the Y-axis in parallel to the ground and the Z-axis in opposite direction from the true north. By default, the Z-axis looks towards the user – this is the reason why we initially set our ball on the (0, 0, -5) position so that it could be 5 meters away in front of the camera.
After we're done with setting 3D objects on the scene, let's move to the app logic.
Our iPhone app development company decided to look first for similar libraries that could work with ARKit in terms of geolocation applications and found one - ARKit+CoreLocation. By using this library, you can add a node that is 'located' on the given geo-coordinates, as well as add the geometry for the node. In other words, you are able to place a 2D image in the needed spot of the scene.
To place an object on the scene, one needs to create an object of the LocationNode class inherited from SCNNode, which contains geo-coordinates. For a node to be placed on the scene, a SceneLocationView class inherited from ARSCNView is used. This class does the main job as it displays the node and its location by using its geo-coordinates.
Let's write a function that allows us to create a LocationAnnotationNode, which is a LocationNode subclass. For a geometry system, we take a two-dimensional plane in the LocationAnnotationNode. This means that, after processing a code, an app will put a 2D image on the pin's spot (on the scene).
Challenges
1. Mathematics
At the outset of the project, we realized that we did not have enough knowledge about 3D modeling and working with graphics engines. Thus, before the development process started, we had to learn more about vectors, geometry, and working with 3D. In case you're in the same position, here is a good source to use.
2. Application of knowledge
To put our gained knowledge to use, we decided to add a kind of an AR compass into our future app. This compass would be an arrow set at the bottom of the screen pointing towards a particular spot on the ground. In the course of development, we learned how to calculate the vector between a user's geolocation and the needed point, as well as find the vector deviation from the true north. As a result of these manipulations, we succeeded in calculating the arrow rotation angle so it could point towards the correct direction.
3. ARKit+CoreLocation Use
When it comes to transposing geo-coordinates into local xyz, it works as follows in a library:
- The actual distance between the user's geo-coordinates and the requested point is calculated.
- Based on this, the engine computes a scaling factor, which is used to proportionally amend the distance (between the camera and 3D model) and the size of the objects in the scene.
- The distance (in longitude/latitude degrees) from the user's current coordinates to the desired point is computed.
- The resulting distance in degrees is multiplied by the scaling factor.
- A scaled distance in degrees is added to the scene.
By default, the library is able to add a point on the scene, relate it to the coordinates on the ground, and if the point is too far, it brings it closer to a user, reducing the Z-coordinate and bringing down the node's scale. This gives an impression that the point is far away, while the actual 3D model is closer than it seems.
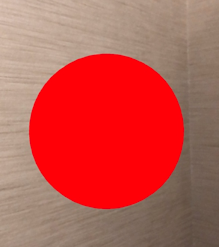
As mentioned before, for the LocationAnnotationNode an image can be used as a type of content. To show the endpoint of the route we used an image of a red ray. We slightly altered the default scaling logic to better meet our expectations. As a result, the red ray cannot be smaller than a certain size regardless of how far the endpoint of the route is. By getting closer to the ray, its size gradually increases.
4. Difficulties when working with ARKit
Unfortunately, ARKit is not accurate enough when it comes to a true north calculation, which sometimes makes the arrow turn in the wrong direction. From time to time, we can get declination accuracy data from a location manager with respect to the north. Therefore, in a case where magnetometer accuracy is low, the user will be shown a message asking them to make eight-directional moves with their phone to calibrate sensors. For the same reason, we decided to run a scene rebuild each time an app updates the endpoint of the route.
Conclusion
We learned a lot from working with AR, and the process was quite interesting. However, it was very different from what business app developers usually do. Normally, we work with tables, databases, data structures, complex animations, and interfaces - stuff that is far from 3D modeling, matrices, vectors, and objects. Here, our goal was to learn how to work with this technology and level up our expertise.
Whilst in app development, some disadvantages of the ARKit became quite obvious for us. These included:
- Lack of accuracy
- Wrong object recognition (to a degree)
- Wrong axes behavior regarding true north location
We wanted to overcome these challenges, and we're proud of what we've achieved so far.
From our perspective, the technology can already be used for serious products. It turned out that our product was relatively advanced, and here are two reasons for that:
- Reasonable battery usage
- FPS is consistent
Apple is actively pushing towards improving this technology, and we at the EGO mobile app company think in the near future we will experience a qualitatively different experience.
If you want to get your hands on this and try to set a 3D pin on a real-life location, go to our GitHub profile and download a sample of the application.


